When I first stepped into the world of food photography, I was surprised by the sheer number of technical terms and jargon. It often felt like navigating a maze, and even now I’m still learning new ones. That experience inspired this post. My goal is to help break down some of these terms so they’re easier to understand and see how they work together to improve your food photography.
Jump to:
In this article, I’m going to talk about 31 essential food photography terms that every food photographer must know. From mastering the Exposure Triangle to understanding the nuances of Bokeh, I’ve got you covered. Whether you’re just starting out or looking to refresh your knowledge, this guide will help clarify some of the key concepts used in food photography. Let’s dive in and turn confusion into clarity.
1. Exposure Triangle
The Exposure Triangle might sound like a secret society for photographers, but it’s actually your first step towards taking breathtaking food photos. Think of it as the Holy Trinity of photography: Aperture, Shutter Speed, and ISO. Each element of the triangle works in harmony to control the amount of light that reaches your camera’s sensor, affecting the brightness, depth, and sharpness of your images.

- Aperture controls how much light enters through your lens. It’s like the pupil of an eye, widening or narrowing to let in more or less light. Aperture also affects the depth of field, determining which parts of your photo are in sharp focus and which parts are softly blurred. This is crucial for making your subjects pop against a dreamy, blurred background.
- Shutter Speed is all about capturing motion. It’s the amount of time your camera’s shutter is open, exposing the sensor to light. Fast shutter speeds freeze action, perfect for capturing splashes or high-speed movements. Slow shutter speeds create a sense of motion, ideal for showing the dynamism of rising steam or smoke.
- ISO measures your camera’s sensitivity to light. Low ISO values mean less sensitivity, requiring more light but producing cleaner, grain-free images. Higher ISO settings can help in low-light conditions, but they often introduce visible grain or “noise” into your photos.
Understanding and balancing these three elements allows you to take control of your photography, rather than leaving it to chance. It’s about making intentional choices to bring your creative vision to life.
2. Aperture
Aperture controls how much light enters your camera through the lens and plays a major role in depth of field (how much of the image appears in focus).
A wider aperture (lower f-number) creates a shallow depth of field, where only part of the image is sharp and the background becomes softly blurred. A narrower aperture (higher f-number) creates a deeper depth of field, keeping more of the scene in focus.
With the twist of a dial, you can:
- Highlight your subject against a blur of colors and shapes.
- Capture textures so vividly, you can almost taste them (think of the flaky layers of a croissant or the silky smoothness of a ganache).
Imagine this: your subject is sharp and inviting, while the background fades into a soft, dreamy blur that quietly draws attention to the food. That’s aperture at work. It’s not just about exposure — it’s about guiding the viewer’s eye to what matters most.
Aperture lets you:
- Boldly define your subject
- Softly tell the rest of the scene to step back
3. Shutter Speed
Shutter speed controls how long your camera’s shutter stays open, determining how much light reaches the sensor and how motion appears in your image.
It’s the difference between:
- Freezing a splash of wine in a glass, with every droplet captured mid-air.
- Allowing gentle motion, like steam rising from a hot espresso, to appear softer and more natural.
With shutter speed, you control how motion is recorded in your photo. Fast shutter speeds (snap!) freeze action, making them ideal for capturing quick movements. Slower shutter speeds (whoosh) allow more light to reach the sensor and can introduce motion blur, adding a sense of movement to the scene.
Shutter Speed is your tool for adding drama or tranquility to your food stories.
4. ISO
ISO is your camera’s sensitivity to light. It determines how sensitive your camera sensor is when capturing an image.
ISO affects:
- Light sensitivity: A higher ISO increases your camera’s sensitivity to light, which can be helpful in low-light conditions. However, it often introduces a side effect — visible noise or grain.
- Image quality: Lower ISO settings usually produce cleaner, sharper images with less noise.
Choosing the right ISO is about balancing brightness and image quality, especially when shooting in different lighting conditions.
5. Depth of Field
Depth of Field (DoF) refers to how much of your image appears in focus. It determines the difference between:
- The hero of your photo — your main subject, captured in sharp detail.
- The supporting elements — props or backgrounds that appear softly blurred and don’t distract from the subject.
Depth of Field (DoF) allows you to control how much of your image appears in focus.
- Deep DoF (higher f-numbers): More of the scene stays in focus — from the details on your food to elements in the background.
- Shallow DoF (lower f-numbers): Only your main subject remains sharp, while the background appears softly blurred
Mastering depth of field helps you guide the viewer’s eye through the image. By deciding what stays sharp and what fades into blur, you highlight the most important part of your subject.
6. Bokeh
Bokeh refers to the aesthetically pleasing quality of the blur in the out-of-focus areas of a photograph. It helps separate the subject from the background and can create a soft, visually pleasing effect, creating:
- Sparkling backgrounds that make your main subject the undeniable focal point.
- Soft, glowing lights that add a romantic, dreamy atmosphere to your scene.
Bokeh often appears as gentle circles of shapes of light, and helps add depth and draw attention to the main subject.
7. Flatlay
In a flatlay, the camera is positioned directly above the subject, capturing the scene from a top-down perspective. Flatlay photography (also known as overhead photography) — focuses on arranging the food and supporting elements carefully so every item contributes to the overall composition.
It involves:
- Strategically arranging your primary subject and props on a flat surface.
- Shooting directly from above, creating a visually appealing layout that tells a story.

Flatlays are about shapes, patterns, color, and texture, all coming together in one harmonious shot.
8. Backlight
Backlight is the secret ingredient for mood in your food photos. It is a technique where the light comes from behind your subject, offering:
- Enhanced textures and silhouettes that give your food a dramatic edge.
- A halo effect that separates your subject from the background, making it pop.

Backlighting is about adding depth and dimension, creating a visual feast that forces the viewer to look closer and admire the details.
9. Tethering
Tethering is the practice of connecting your camera to a computer or tablet, allowing you to:
- View your images in real time on a larger screen.
- Make quick adjustments to lighting, composition, or styling based on immediate feedback.
This technique is invaluable for food photographers who strive for perfection, offering the ability to tweak and refine until every element of the shot is just right.
10. Rule of Thirds
The Rule of Thirds is the golden rule of composition that divides your frame into a 3×3 grid. Placing your subject along these lines or at their intersections creates:
- A balanced, visually pleasing image that feels natural to the viewer.
- Dynamic tension and interest, drawing the eye into the composition.
This technique is your guide to creating engaging, well-composed shots that tell a story and captivate your audience, making every photo an invitation to explore.
11. Fibonacci Spiral
The Fibonacci Spiral, often associated with the Golden Ratio, is a composition technique inspired by patterns found in nature. By arranging elements of your photo along the curve of the spiral, you can create:
- Natural flow and movement that guides the viewer’s eye through the image.
- A sense of balance and harmony in the composition.
This approach can help structure your image in a way that feels natural and visually pleasing.
12. Histogram
A histogram is a graphical representation of the tonal values in your photograph, showing the range from the darkest shadows to the brightest highlights.
Understanding it helps you:
- Evaluate exposure, ensuring details are not lost in shadows or highlights.
- Adjust the tonal balance of your image, whether you want stronger contrast or softer, more subtle tones.

Reading the histogram is like reading the map to your final image, guiding your adjustments to achieve the perfect exposure every time.
13. RAW
Shooting in RAW format captures all the data from your camera sensor, giving you:
- Maximum quality, with more detail and a higher dynamic range.
- Greater flexibility in post-production, allowing for extensive adjustments without loss of quality.
Think of RAW files as the uncut gems of your photography, ready to be polished into the dazzling images you envision.
14. Hero Food
Hero Food refers to the perfectly styled food (your main subject) in your photograph, designed to:
- Capture attention and evoke desire, making viewers wish they could reach into the photo and take a bite.
- Showcase the best version of the subject, with meticulous attention to detail, color, and texture.
Your hero food is your lead actor, delivering a performance that’s both visually stunning and emotionally engaging.
15. Negative Space
Negative Space is the empty area around the subject in an image, serving to:
- Draw focus to the main subject, by eliminating distractions.
- Create a sense of simplicity and elegance, emphasizing the beauty of minimalism.

Utilizing negative space is about mastering the balance between what is and isn’t there, crafting images that breathe and speak volumes in their quiet.
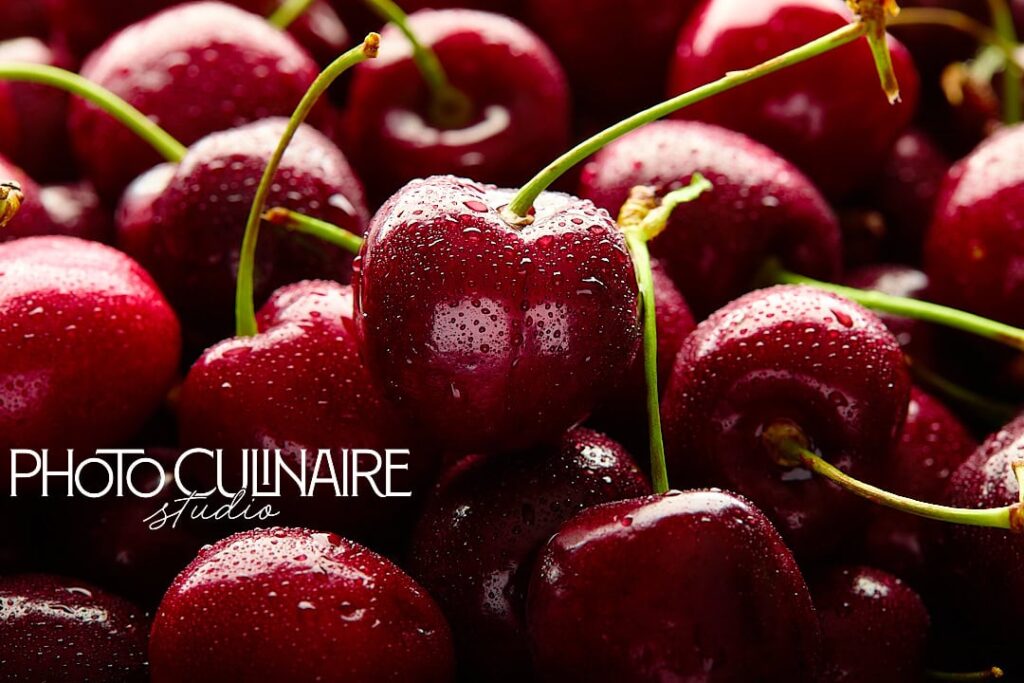
16. Specular Highlights
Specular Highlights are the bright spots of light that reflect off shiny surfaces in your photography, offering:
- Visual interest and texture, adding a lively sparkle to your subject.
- Clues about the quality and texture of the food, from glossy chocolate to sparkling beverages and cherries sprinkled with water.

Harnessing these highlights can elevate the appeal of your food, making it look fresher and more tantalizing.
17. Flash
A flash in photography provides a brief burst of light that helps illuminate a scene, especially in low-light conditions. The flash duration is extremely short — often around 1/1000 of a second or faster, which helps freeze motion and capture the fine details.
Most flashes produce light close to daylight color temperature (around 5500K), helping maintain natural-looking colors in your images.
Using a Flash provides a burst of light that can help you:
- Freeze motion in your food photography — capturing details like a sprinkle of salt or a splash of wine with crisp clarity.
- Add depth and dimension to your images by highlighting textures and important details.
Whether you’re working in a dimly lit room, or trying to create a specific lighting effect, flash gives you greater control over light in your scene.
18. Post-Production
Post-Production is where your food photography comes to life, allowing you to:
- Adjust exposure, color balance, and sharpness, fine-tuning your images to match your vision.
- Remove small imperfections or distractions, helping your main subject stand out.
This stage is your opportunity to polish your photos, enhancing the natural beauty of your subjects, and presenting them in their best light with the use of editing software.
19. Hard Light
Hard Light is the light that creates strong, well-defined shadows and highlights, adding:
- Dramatic contrast to your food photography, emphasizing texture and detail.
- A sense of realism and intensity, making your subjects pop with vibrancy and depth.

While challenging to master, hard light can transform the mundane into the magnificent, giving your photos a bold, editorial feel.
20. Soft Light
Soft Light offers a more forgiving, diffused illumination, producing:
- Gentle shadows and subtle highlights, for a more natural, inviting look.
- Even, flattering light that wraps around your subject, softening textures and reducing harsh contrasts.
Ideal for creating a cozy, approachable atmosphere, soft light enhances the inherent beauty of your food without overpowering it.
21. Shaping Light
Shaping Light refers to the process of directing and modifying light to create a specific mood or effect in your photographs. It’s about controlling how light falls on your subject.
Common techniques include using diffusers, reflectors, and black or white cards to:
- Soften harsh shadows
- Highlight specific areas
- Block or reduce unwanted light
- Create subtle patterns or textures with light
Shaping light helps you control shadows and highlights, allowing you to create an atmosphere that complements your subject.
22. White Balance
White Balance ensures that the colors in your images appear natural and accurate. It compensates for the color temperature of different light sources, preventing:
- Orange/Yellow tints under tungsten light.
- Blue tones in shade or on a cloudy day.
By adjusting white balance, you’re maintaining color fidelity, ensuring the vibrant greens of basil and the rich reds of tomatoes are true to life, making your subjects look as delicious as they taste.
23. Global and Local Adjustments
In photo editing, Global and Local Adjustments stand as your toolkit for perfection. Here’s the breakdown:
- Global Adjustments are global edits that affect the entire image. Think exposure, contrast, and saturation — broad strokes that set the scene.
- Local Adjustments are targeted edits. They’re about fine-tuning specific areas without altering the whole picture.
This dual approach allows for meticulous control over your image, ensuring every detail is exactly as you envision.
24. C-Stand
A C-Stand (or Century Stand) is the backbone of many photography setups, especially in food photography. It’s not just a stand; it’s a versatile tool that:
- Holds lighting equipment, reflectors, or backdrops.
- Adjusts to various heights and angles, offering unparalleled flexibility — and especially useful for flatlay or overhead shots.
With a C-Stand, you’re prepared to tackle any lighting challenge, ensuring your subject always looks its best under the perfect light.
25. Focal Length
Focal Length is more than just a number on your lens — it influences how your scene is captured in food photography.
It affects:
- Angle of view: How much of the scene your camera can capture.
- Magnification: How large or close your subject appears in the frame.
Choosing the right focal length can make the difference between a tight close-up of a cookie and a wider shot that captures the entire table setting. It’s about selecting the lens that best suits the story you want your photos to tell.
26. Macro Shots
Macro photography takes you up close and personal with small subjects, making them appear life-sized or even larger in the photo. It lets us discover details usually invisible to the naked eye. This method:
- Uncovers the stunning intricacy and allure of food, far beyond what regular photos can show.
- Turns the textures, colors, and forms of food into the stars of the show, giving your audience a vibrant and captivating experience.
27. Freezing Action
Freezing Action in food photography means capturing fast-moving moments (it’s like stopping time), so they appear sharp and still in the final image. It allows you to photograph details that happen too quickly for the eye to fully notice, such as:
- A splash of milk falling into a cup of coffee.
- Powdered sugar floating in the air as it’s sifted over donuts.


This effect is achieved by using fast shutter speeds and precise timing, sometimes combined with controlled lighting such as a flash, allowing you to capture motion sharply in a single still image.
28. Motion Blur
Motion Blur adds a sense of movement to your food photographs, creating a dynamic feeling that suggests action and process, such as:
- The swirl of a spoon stirring a pot.
- The graceful fall of sprinkles onto a cake.
This effect is created by intentionally using a slower shutter speed, allowing moving elements to appear blurred while the rest of the scene remains in focus.
29. F Number/F Stop
The f-number (or f-stop) on your lens controls how wide or narrow the aperture opens, determining how much light reaches your camera’s sensor. It plays an important role in:
- Controlling depth of field, which determines how much of your image appears in focus — from a shallow blur to a deeper area of sharpness.
- Adjusting exposure, helping you balance the brightness of your photo so it’s not too dark or too bright.
Understanding f-stops helps you control both the look and exposure of your images.
Here’s how f-numbers work:
- A lower f-number (such as f/2.8) creates a Shallow Depth of Field — meaning your main subject appears sharp while the background becomes softly blurred (bokeh).
- A higher f-number (such as f/16 or f/22) creates a Deep Depth of Field — meaning more of the scene — from foreground to background is in focus.
30. Distortion
Distortion refers to how a lens can alter the shape or proportions of objects in a photo. In food photography, distortion can either help or harm your composition.
It’s important to:
- Minimize unwanted distortion, which can make plates look oval or stretch the proportions of your food.
- Use distortion creatively, when appropriate, to emphasize certain elements or create a more dynamic perspective.
By choosing the right lens and shooting angle, you can control distortion and keep your food looking natural and well-proportioned.
31. Sharpness
Sharpness in photography translates to the clarity and detail in your images. Achieving optimal sharpness means:
- Your viewer can almost taste the crunch of that pizza crust, or the smoothness of that sauce.
- Every texture and color pops, making the food as appealing visually as it is gastronomically.
Sharpness is influenced by factors such as accurate focus, stable shooting conditions, proper lighting, and careful post-processing.
Final Thoughts
As we wrap up this guide, we’ve explored 31 essential food photography terms that help build a stronger understanding of how your camera, lighting, and composition work together. From concepts like Macro Photography and Depth of Field, to tools such as Tethering and Histograms, each term plays a role in helping you create more thoughtful and visually compelling food photographs.
Learning the language of food photography makes it easier to control your camera, refine your technique, and bring your creative ideas to life.
Now I’d love to hear from you. Are there any food photography terms that still feel confusing? Or was there a concept that completely changed the way you shoot once you understood it? Share your thoughts or questions in the comments below — your experience might help another photographer on the same journey.
. . . . .


