Do you struggle to capture the perfect food photo? Does something always feel just a little off? Often, the issue isn’t the food itself, or even the lighting — it’s about mastering Shutter Speed. This often-overlooked camera setting can play a key role in creating sharp, visually appealing food photographs.
Jump to:
It’s the difference between a static photo and a dynamic, engaging image. I remember when I first started, I was frustrated by blurry and dull photos, until I finally grasped the power of Shutter Speed.
Shutter Speed isn’t just a technical term; it’s the key to controlling how motion is captured in your frame. It determines how long your camera’s sensor is exposed to light. This control is essential for everything from freezing a falling crumb to creating a soft blur of pouring honey.
What is Shutter Speed?

We all know that click a camera makes. That’s the sound of the shutter opening and closing, capturing the light that creates our photograph. Shutter speed, quite simply, is how long that shutter stays open. It’s the duration of time your camera’s sensor is exposed to light. This seemingly simple concept has a massive impact on the final image.
Think of it like blinking your eye. A quick blink is like a fast shutter speed — you see a fleeting snapshot. A slow, prolonged blink (if you could manage it) is like a slow Shutter Speed — more light enters your eye, and motion might appear blurred. In a camera, the shutter controls precisely how much light reaches the sensor, and for how long. This control is fundamental to capturing the perfect food photo.
Shutter Speed influences:
- Brightness (Exposure): A longer Shutter Speed lets in more light, resulting in a brighter image. A shorter Shutter Speed lets in less light, creating a darker image.
- Freezing Motion vs. Motion Blur: A fast Shutter Speed freezes motion, capturing sharp details. A slow Shutter Speed allows movement to blur, creating a sense of motion in the image.
Understanding these two effects is crucial for any food photographer. We’ll dive deeper into how Shutter Speed affects your images in the next section, but for now, remember this: Shutter Speed is all about controlling time and light. It’s a powerful tool that, when mastered, can transform your food photography.
Why is Shutter Speed Crucial for Food Photography?
Shutter Speed isn’t just a technical setting; it’s a creative tool that can dramatically impact your food photos. It gives you precise control over how motion is captured, allowing you to freeze fleeting moments or create artistic blur. This control is especially important in food photography, where capturing textures, movement, and the overall feel of a subject is paramount.


Imagine trying to photograph a splash of milk. A slow Shutter Speed would result in a blurry mess. But with the right fast Shutter Speed, you can capture each individual droplet in stunning detail. Conversely, imagine capturing steam rising from a hot soup. A slightly slower Shutter Speed can create a beautiful, ethereal blur that adds to the image’s atmosphere. I’ve found that these subtle details are what elevate a good food photo to a great one.
Here’s why Shutter Speed is so crucial in food photography:
| Freezing Motion | Creative Blur | Controlling Exposure |
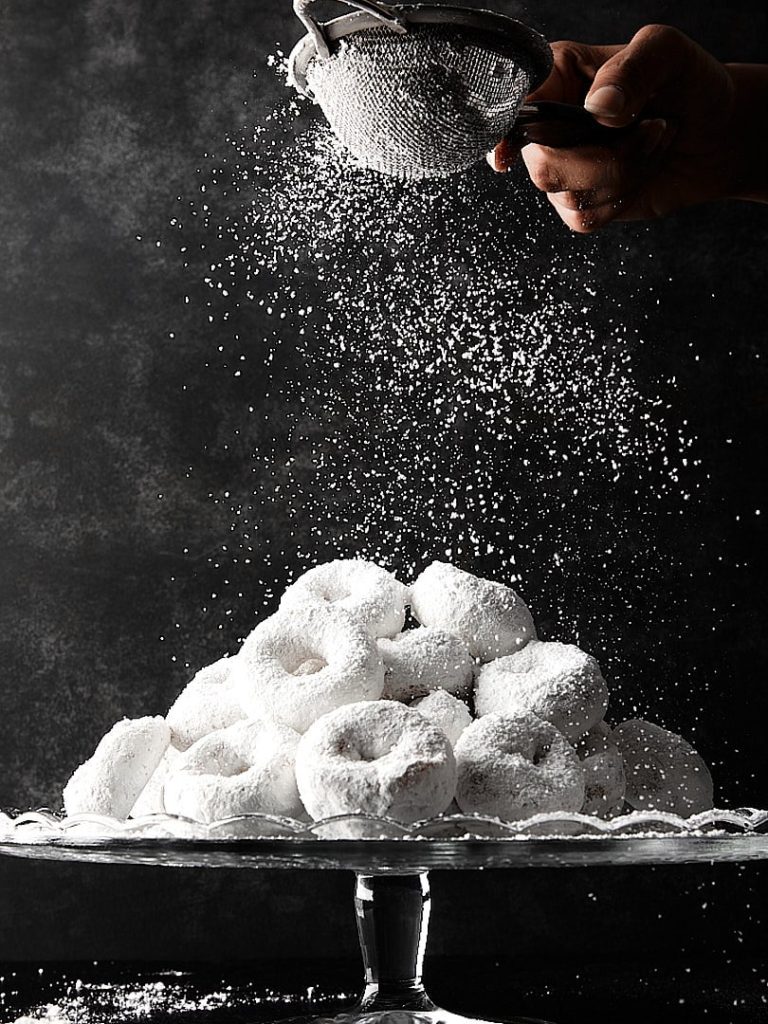
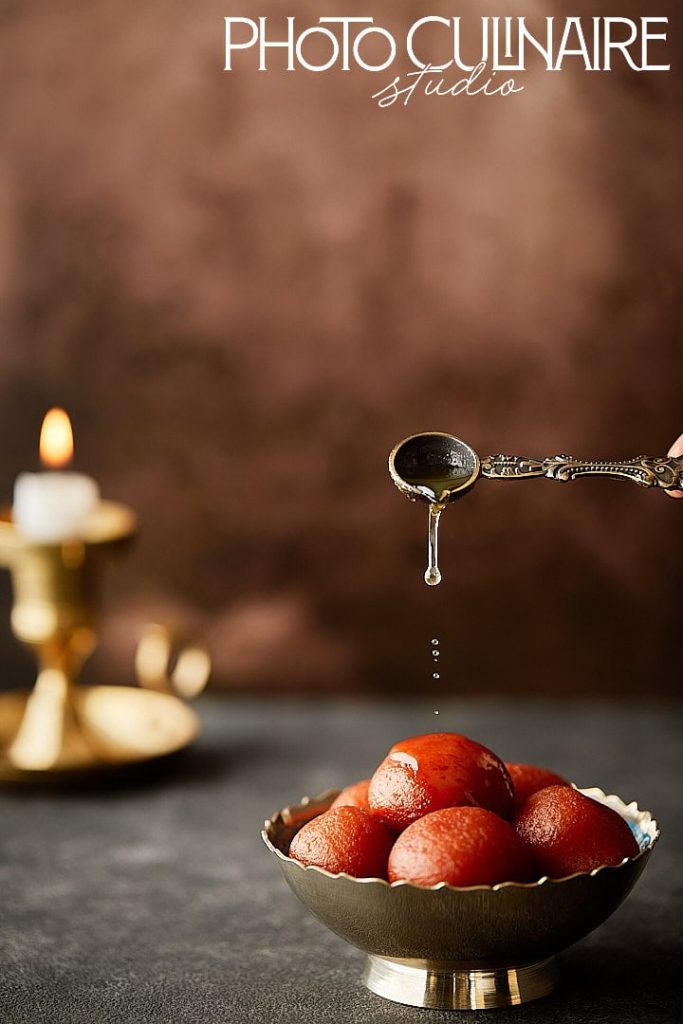
| Want to capture the perfect pour of honey or a sprinkle of powdered sugar? A fast Shutter Speed is essential for freezing these quick movements, ensuring sharp details and preventing unwanted blur. Think crisp and clear. | Sometimes, you want to blur. A slow Shutter Speed can create a sense of motion, making a swirling sauce or a falling ingredient more dynamic and visually appealing. This adds an artistic touch, conveying movement and energy. | Shutter Speed is one of the three pillars of exposure triangle (along with ISO and Aperture). It directly affects how much light reaches your camera’s sensor. This means you can use it to brighten or darken your image, depending on the lighting conditions. |
Understanding Shutter Speed is fundamental to achieving creative control over your food photography.
How to Measure Shutter Speed
Shutter Speed is measured in seconds — or, more commonly, in fractions of a second. This might sound confusing at first, but it’s actually quite simple. The time the camera’s shutter stays open is written as a fraction, like 1/100th of a second (written as 1/100) or 1/500th of a second (1/500). The smaller the fraction (meaning, the larger the denominator), the faster the Shutter Speed.
Think of it like slicing a pie. If you cut a pie into 100 slices (1/100), each slice is larger than if you cut it into 500 slices (1/500). Similarly, 1/100 of a second is a longer exposure time than 1/500 of a second, meaning the shutter stays open longer and lets in more light.
A Shutter Speed of 1/2 means one-half of a second, while 1/250 means one two-hundred-fiftieth of a second. When the shutter stays open for one second or longer, it is considered a very slow Shutter Speed in photography.
Here are the key points to remember:
- Units: Shutter Speed is always expressed as fractions of a second (e.g., 1/60, 1/250) or as whole seconds (e.g., 1s, 10s, 30s).
- Interpretation: A Shutter Speed of 1/250 means the shutter is open for one two-hundred-fiftieth of a second.
- Faster vs. Slower: A larger denominator (like 1/500) indicates a faster Shutter Speed than a smaller one (like 1/60). Whole numbers (1, 2, 3… up to 30 seconds) represent slow Shutter Speeds.
Here are some common Shutter Speeds, ranging from very slow to very fast:
- 30 seconds
- 10 seconds
- 1 second
- 1/10
- 1/30
- 1/60
- 1/125
- 1/250
- 1/500
- 1/1000
- 1/1600
- 1/2000
- 1/4000
Most modern DSLRs and mirrorless cameras offer a wide range of Shutter Speeds. They often reach speeds as fast as 1/4000th of a second, with some even going up to 1/8000 of a second. On the other end of the spectrum, they can achieve very slow Shutter Speeds, sometimes as long as 30 seconds. This wide range gives you incredible flexibility to control both light and motion in your food photography.
How Does Shutter Speed Affect Your Images?
Shutter Speed impacts your images in two primary ways: it affects both exposure (brightness) and sharpness (detail). Let’s break down each of these effects:
1. Shutter Speed Increases and Decreases Exposure (Brightness)
Shutter Speed plays a crucial role in determining the overall brightness of your image. Depending on your other camera settings (Aperture and ISO), a slower Shutter Speed allows more light to reach your camera’s sensor, resulting in a brighter image. Conversely, a faster shutter speed allows less light to hit the sensor, creating a darker image.
This has significant implications for achieving the correct exposure. Much of photography revolves around capturing the right amount of light, and adjusting the shutter speed is a key way to control this. I often think of it as a tap: the longer you leave the tap open (slower Shutter Speed), the more water (light) flows.
To summarize:
- Faster Shutter Speed: Shutter is open for shorter time = Less light = Darker image.
- Slower Shutter Speed: Shutter is open for longer time = More light = Brighter image.
The brightness of a photograph directly depends on how long your camera’s sensor is exposed to the scene.
2. Shutter Speed Increases and Decreases Sharpness (Motion)
This is where the creative magic of Shutter Speed really comes in. Faster Shutter Speeds freeze motion, while slower Shutter Speeds blur motion. This is a fundamental concept, and it’s essential to grasp for effective food photography.
Imagine photographing a drizzle of honey. At a Shutter Speed of 1/1500 of a second, each droplet will be captured with incredible sharpness. But if you photograph that same drizzle at 1/15 of a second, it will appear as an indistinguishable blur. I’ve learned that this is where the artistic potential truly shines.
A too-slow Shutter Speed is a common culprit for blurry photos, especially when capturing movement. So, always pay close attention to your Shutter Speed, ensuring it’s fast enough to achieve the desired result.
In short:
- Faster Shutter Speed: Sharpness (freezes motion).
- Slower Shutter Speed: Blur (creates motion blur).
How to Set the Shutter Speed on Your Camera

While the exact mechanics of adjusting Shutter Speed can vary slightly between camera models, the process is usually quite straightforward. It often involves rotating a dial or using on-screen controls (I always recommend consulting your camera’s manual for specific instructions). The key thing to understand is that your ability to change the Shutter Speed depends on the camera Mode you’re using.
Here’s a breakdown of the common camera Modes and how they relate to Shutter Speed:
- Auto Mode: In Auto Mode, the camera makes all the decisions for you, including Shutter Speed, Aperture, and ISO. This is convenient for quick snapshots, but it offers no creative control over your images. I strongly advise against relying on Auto Mode if you’re serious about improving your photography.
- Manual Mode (M): In Manual Mode, you are in complete control. You manually set the Shutter Speed, Aperture, and ISO. This gives you maximum creative freedom but requires a good understanding of how these settings interact.
- Shutter Priority Mode (Tv or S): In Shutter Priority Mode (often labeled as “Tv” for Time Value on Canon cameras or “S” for Shutter on Nikon cameras), you choose the Shutter Speed, and the camera automatically selects the appropriate Aperture (and ISO if Auto ISO is enabled) to achieve a proper exposure. This Mode is fantastic for situations where controlling motion is your primary concern, like capturing a splash or a pour. We’ll explore this Mode in more detail in the next section.
Different camera modes are suited for different situations. Don’t get stuck in a single Mode. Instead, learn to adjust your mode dial based on your specific photographic needs. As you progress in your photography journey, I encourage you to move away from Auto Mode. It can seriously hinder your growth as a photographer and prevent you from fully realizing your creative vision.
What is Shutter Priority Mode?
Shutter Priority Mode (Tv or S) gives you direct control over Shutter Speed while the camera automatically adjusts the Aperture (and ISO, if Auto Iso is enabled) to achieve a balanced exposure. This makes it a fantastic stepping stone for beginners who aren’t quite ready to dive into full Manual Mode. It allows you to focus on the creative aspect of controlling motion without getting bogged down in managing all three exposure settings simultaneously. It’s like having training wheels on a bicycle, but you’re still steering.
Shutter Priority Mode is particularly useful in food photography when you want to precisely control motion blur. For example, if you’re capturing a liquid pour or a splash, you can set a fast Shutter Speed to freeze the action in sharp detail. This Mode essentially gives you the power to capture movement with clarity, all based on your chosen Shutter Speed setting.
Here’s when Shutter Priority Mode really shines:
- Capturing Action: Use Shutter Priority Mode when photographing flying food, drips, pours, splashes — or any other type of action shot — where you want to freeze the movement without any blur. In these scenarios, you would select a fast Shutter Speed to stop the action and let the camera determine the appropriate ISO and Aperture based on the available light.


Note
The main drawback of Shutter Priority Mode is that you have limited control over the Depth of Field. Because the camera is choosing the Aperture, you can’t directly control how much of your image is in focus. This is something to keep in mind, especially when depth of field is a critical element of your composition.
Fast and Slow Shutter Speeds = Freezing and Blurring Motion
Shutter Speed’s most dramatic effect is on how motion is captured in your images. It’s the difference between freezing a fleeting moment and creating a sense of movement and dynamism. Let’s explore these two extremes:
1. Fast Shutter Speed = Freeze Motion
When you use a fast Shutter Speed, the shutter opens and closes very quickly, allowing only a small amount of light to enter the camera. This has a powerful creative implication: it allows you to freeze time.
Fast enough Shutter Speeds can capture movements so quick that the human eye wouldn’t normally perceive them. This gives food photographers a nearly magical ability to encapsulate a single, fleeting moment. Imagine capturing individual droplets of a sauce being drizzled or the precise moment a sprinkle of salt hits a dish.


What constitutes a “fast” Shutter Speed depends on the speed of the subject you’re photographing. For a fast-moving honey drizzle, you might need 1/1000th of a second or faster. However, for stationary food photography, you can often use speeds like 1/100th or 1/200th of a second without introducing noticeable motion blur. I’ve found that experimenting is key to finding the right speed for each situation.
Remember
The faster the Shutter Speed, the less light enters the camera. You’ll likely need to adjust your Aperture and/or ISO to compensate for this and maintain proper exposure.
2. Slow Shutter Speed = Blur Motion
Conversely, a slow Shutter Speed means the shutter stays open for a longer period, allowing more light to enter the camera. This creates motion blur, which can add a sense of movement, dynamism, and even a dreamlike quality to your images. You’ve probably seen this effect in photos of waterfalls, where the water appears smooth and silky.
While this technique is commonly used in landscape photography, its applications in food photography are more limited. Unless you’re intentionally trying to capture the movement of a pouring liquid or steam rising from a dish, slow Shutter Speeds are generally less useful in this genre. It’s important to note that when using slow Shutter Speeds (generally 1 second or longer), a tripod is essential to prevent camera shake and ensure sharp results for the stationary parts of your image.
The slower the Shutter Speed, the greater the blur. This is crucial to remember when deciding which Shutter Speed to use.
| Feature | Fast Shutter Speed | Slow Shutter Speed |
| Effect | Freezes motion | Blurs motion |
| Purpose | Captures sharp details of fast-moving subjects. | Creates a sense of movement. |
| Light | Requires more light (adjust Aperture/ISO). | Requires less light. |
| Stability | Generally less sensitive to camera shake. | Requires a tripod for sharp results with stationary subjects. |
| Example Speeds | 1/500s, 1/1000s, 1/4000s | 1s, 1/2s, 1/10s |
What is the Best Shutter Speed to Use?
The question of the “best” Shutter Speed doesn’t have a single, definitive answer. It all comes down to this: What kind of photo do you want to create? Determining the right Shutter Speed requires considering your desired outcome for the image. I’ve learned that it’s less about following a rigid rule, and more about making a creative choice based on the specific situation.


There’s no magic formula that works in every scenario. However, there are some helpful starting points to guide you. Here are some common food photography situations and suggested Shutter Speed settings:
Recommended Shutter Speed Settings for Specific Situations
Capturing movement in food photography can create truly captivating images. Smoke, steam, powdered sugar, sprinkling salt, drizzling honey — the possibilities are endless. The ideal Shutter Speed will always depend on the speed of the element you’re capturing. But here are some general guidelines to get you started:
| Pouring smooth liquids (chocolate, caramel) | Start around 1/250th of a second |
| Capturing smoke or steam | Start around 1/60–1/200th of a second |
| Falling fine particles (icing sugar, grated cheese) | Try 1/800th of a second |
| Fast-moving liquids (honey swirl) | Start around 1/1000th of a second or faster |
Pro Tip
I recommend taking a few test shots at these starting points and then reviewing the images. If the motion is still blurry, increase your Shutter Speed (use a smaller fraction). If the image is too dark due to the fast Shutter Speed, you may need to adjust your Aperture or ISO to compensate.
Capturing movement effectively is a combination of skill, patience, and a bit of luck. Don’t get discouraged if you don’t nail it on the first few tries. I can’t tell you how many attempts it took me to get some of my best shots.
I remember one honey swirl that took 23 attempts, a perfect dusting of icing sugar on cupcakes took 41 photos, and capturing wisps of smoke took over 100 shots. And there have been many times it has taken even more than that. The key is to keep experimenting and refining your settings until you achieve the desired effect.
The Curious Case of Shutter Speed Settings for Flash/Artificial Light
Using flash or artificial light introduces another layer to the Shutter Speed equation. The ideal Shutter Speed setting in these situations depends primarily on your camera’s flash sync speed and the existing lighting conditions.
- Flash Sync Speed: Your camera has a maximum Shutter Speed that it can use in conjunction with a flash. This is called the flash sync Speed. For most cameras, this speed falls between 1/200th and 1/250th of a second. Using a Shutter Speed within this range ensures that the flash fires when the shutter is fully open, resulting in a properly exposed image. If you use a faster Shutter Speed than your sync speed, you’ll likely get dark bands across your image because the shutter curtains will partially block the flash.
Note
Always consult your camera’s manual to find its exact flash sync speed. This is crucial to avoid incorrectly exposed images.
- High-Speed Sync (HSS): Some cameras and flashes offer a feature called High-Speed Sync (HSS), which allows you to use Shutter Speeds much faster than your camera’s standard flash sync speed, sometimes up to 1/8000th of a second. This is especially useful when balancing bright ambient light, such as sunlight, with flash, allowing you to use wider apertures or freeze very fast motion. However, using HSS usually reduces the effective power of your flash because it fires a series of rapid pulses instead of a single burst. In most food photography situations, HSS is rarely necessary.
- Low Ambient Light: In low-light environments where the ambient light is minimal, any Shutter Speed slower than your maximum flash sync speed will generally work fine. The flash will be the primary light source, and the Shutter Speed will primarily control the exposure of the background.
- Slower Sync Speeds: Using Shutter Speeds slower than your sync speed (like 1/60th or 1/30th) can introduce motion blur, especially if your subject or the camera moves during the exposure. While this can be used intentionally for creative effects, it’s generally something to avoid in most food photography scenarios.
- Adjusting for Creative Effects: While your camera’s sync speed is the standard for proper flash exposure, you can intentionally use slower Shutter Speeds to incorporate ambient light into your image and create motion blur effects. This can add a unique dimension to your photos, but it requires careful balancing of the flash and ambient light.
Shutter Speed Tips and Tricks
Here are some practical tips and tricks to help you master Shutter Speed and take your food photography to the next level:
1. Avoid Camera Shake
One of the most common causes of blurry images is camera shake, which occurs when the camera moves during the exposure. To avoid this, you need to use a sufficiently fast Shutter Speed. This depends on a few factors, including whether your lens or camera has built-in Image Stabilization. However, the most important factor is the focal length of your lens. The more you zoom in (longer focal length), the more noticeable any camera shake becomes.
A helpful rule of thumb is to set your Shutter Speed to at least the reciprocal of your focal length when hand-holding your camera. For example, if you’re using a 100mm lens, your Shutter Speed should be at least 1/100th of a second or faster.
For general food photography, a Shutter Speed between 1/125th and 1/200th of a second is usually sufficient when hand-holding the camera. This helps minimize camera shake and freeze any minor movements of the food. If you’re using a tripod, you can often use slower Shutter Speeds, depending on the lighting conditions.
2. Use a Sturdy Tripod

Using a tripod almost completely eliminates camera shake (unless you accidentally bump it). A tripod is essential for low-light photography and for capturing action shots or any food photos involving movement or freezing action. While some action shots are possible without a tripod, they are significantly more challenging.
When using a tripod for action shots, I often use the camera’s self-timer. I set the timer and then start the motion just before the camera takes the picture. It often takes several attempts to get the timing right, but that’s all part of the process. For even more precise control, consider using a remote shutter release. This allows you to trigger the shutter exactly when you want, without touching the camera.
3. Use Motion Blur Wisely
While motion blur can be a powerful creative tool, it’s generally less desirable in most food photography. Use it intentionally and sparingly, only when it enhances the image and serves a clear purpose. Avoid motion blur that simply makes the image look technically flawed.
4. Transition to Flash (Sooner Rather Than Later)
Using flash can dramatically improve the consistency of your images. While natural light can be beautiful, it’s often unpredictable. Flash provides consistent and controllable light, making it easier to achieve consistent results. I recommend gradually incorporating flash into your workflow as you become more comfortable with the basics of photography.
5. Choose a Contrasting Background
When photographing moving elements like smoke, powdered sugar, or grated cheese, choose a background that provides good contrast. A dark background will make lighter elements stand out, while a light background will work well for darker elements like chocolate. This contrast will enhance the visibility of the moving element, and create a more visually appealing image.
Capture Stunning Food Photos with Shutter Speed Mastery
Shutter Speed is a powerful tool in any photographer’s arsenal, and it’s especially crucial for creating mouthwatering food photos. Understanding how it affects exposure and motion allows you to transform ordinary photos into dynamic and captivating images. Remember, it’s about controlling time and light to capture the perfect moment.
Here are the key takeaways we covered:
- Shutter Speed controls how long your camera’s sensor is exposed to light.
- Fast Shutter Speeds freeze motion, while slow Shutter Speeds blur it.
- Shutter Priority Mode lets you control Shutter Speed while the camera handles Aperture and ISO.
- The best Shutter Speed depends on the specific situation and the desired creative effect.
- Using a tripod and understanding flash sync speed is essential for sharp results in certain situations.
Shutter Speed isn’t just a technical setting; it’s a way to express your creative vision. It’s the difference between a static record and a dynamic story. By experimenting and practicing with different Shutter Speeds, you’ll develop a feel for how to capture the perfect balance of sharpness, motion, and light, ultimately creating food photos that truly tantalize the senses.
Now over to you: How do you plan to select your Shutter Speed from now on? Do you have any Shutter Speed tips? Share your thoughts in the comments below.
. . . . .