Have you ever found yourself puzzled by the off colors in your food photos? You’re not alone. White Balance is the unsung hero of photography, especially in food photography, where the right color can make your food look mouthwatering. It’s all about getting those whites right, ensuring the colors in your photos reflect reality. So if you’re a seasoned pro or just starting out, mastering White Balance is key to capturing those perfect food shots.
Jump to:
In this guide, I’ll break down the essentials of White Balance, explore why it’s a game-changer in food photography, and provide you with practical steps to nail it every time.
Get ready to transform your food photography with the power of White Balance!
What Exactly Is White Balance?

Think of White Balance as the thermostat for your photos, a crucial setting that adjusts the color temperature, to ensure what’s white in reality is also white in your images. This adjustment is key, as it aligns all other colors, giving your photos a natural and authentic look.
Why White Balance is a Big Deal in Digital Photography
Imagine your favorite food photos with weird, off-putting colors — that’s what happens without correct White Balance! White Balance is crucial for accurate food colors. Without White Balance, we would have bad color reproduction in our images. With incorrect White Balance, your food photos can look too cool (blueish/greenish) or too warm (orangish/yellowish) — making your food photos look highly unappetizing. Different lighting creates different color tints, but our eyes automatically adjust to the change, while our cameras need help to do the same.


Along with the exposure triangle in food photography, white balance is one of the key fundamentals every photographer should understand.
Here’s How White Balance Helps:
- Corrects Color Casts: Those pesky, unwanted tints that can throw off your image’s vibe? White Balance tackles them head-on.
- Ensures Color Accuracy: It’s like giving your camera a cheat sheet on how to interpret colors under varying lights.
The Basics of White Balance
- Purpose: It tells your camera how to interpret colors under different lighting conditions, ensuring your photos’ colors match what you see with your eyes.
- Impact: Correct White Balance eliminates unrealistic color casts, making your images more appealing and accurate.
Color Casts: Spotting and Fixing
- What Are They? Unwanted tints that can skew the perception of your image.
- Solution: Adjust the White Balance to neutralize these tints, ensuring colors are true to life.
Setting White Balance in Food Photography
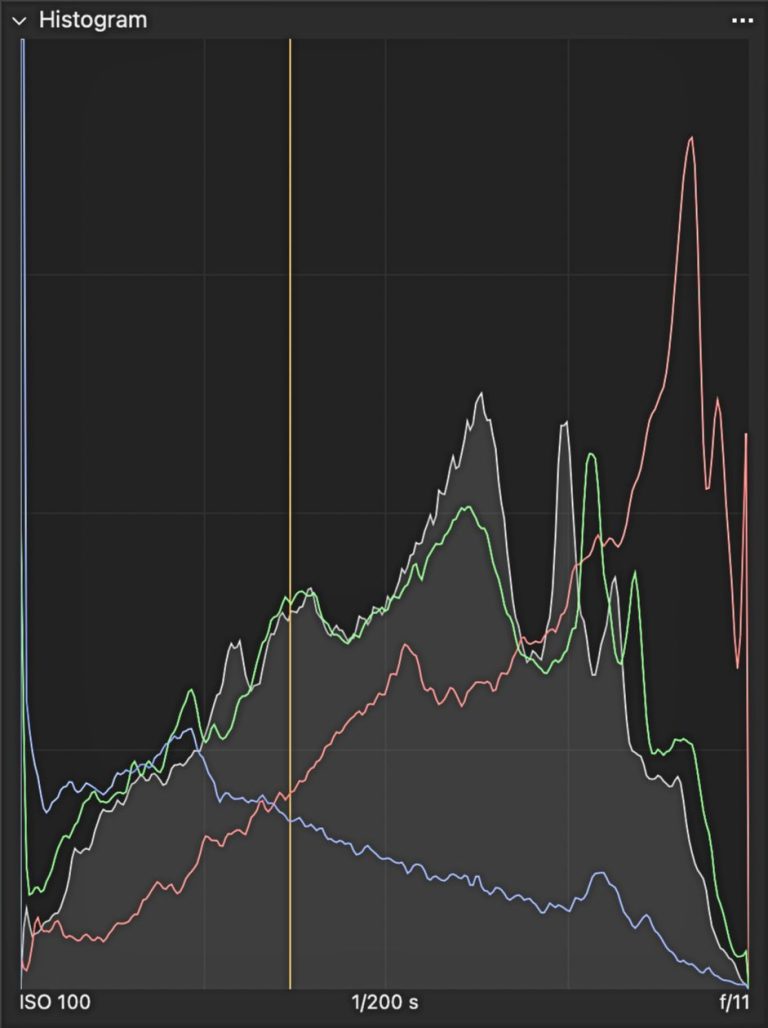
- Why It Matters: The right White Balance can make your subject look appetizing and true to color. Incorrect White Balance can make food look unappealing. Checking your histogram can also help you see if your image is too warm, too cool.
- How to Adjust: Use your camera’s White Balance settings and Post-production software to correct color temperature, ensuring your food looks as delicious in photos as it does in real life. It also helps to understand Manual Mode so you can control your settings more confidently while shooting.
By understanding and adjusting White Balance, you ensure your food photography is not just about capturing food but presenting them in their truest, most appetizing colors.
Color Temperature of Light — Kelvin

When we talk about color temperature, we’re diving into the world of Kelvin, a scale that measures the hue of your light source. This isn’t about how hot or cold the light is to the touch, but rather the color it emits in your photos.
What is Kelvin?
- Definition: Kelvin (K) is the unit of measurement that describes the hue of a particular light source.
- Scale: Ranges from warm (lower Kelvin values) to cool (higher Kelvin values).
Color Temperature in Everyday Life
- Warm Light: Think of the golden hues during sunrise or sunset, typically around 1,000 to 3,500 K.
- Cool Light: Blue sky or overcast conditions, falling in the range of 6,500 to 10,000 K.
- Neutral Light: Daylight, around midday, sits at about 5,600 K, considered the standard for white light.
Why It Matters in Photography
- Mood Setting: The color temperature can dramatically alter the mood of your photo, from warm and cozy to cool and distant.
- Color Accuracy: Getting the Kelvin setting right means your camera interprets colors accurately, crucial for making your food look appetizing.
Adjusting Kelvin in Food Photography:
- Natural Light: Be mindful of the time of day and weather conditions, as these will influence your Kelvin setting. This becomes especially important when using backlighting in food photography, where color temperature can shift quickly.
- Artificial Light: Know the Kelvin rating of your bulbs or flashes to adjust your camera settings accordingly.
By tuning into the Kelvin scale, you take control of the color temperature in your photography, ensuring that your subject looks as inviting and true-to-life as possible.
How to Correct White Balance in Food Photography


Achieving the perfect White Balance in food photography is crucial for showcasing your subjects in their true colors. White Balance can be fixed either in-camera or during post-processing. Let’s step into the methods and strategies to master the White Balance, ensuring your food photos look as delectable as they taste.
1. Auto White Balance (AWB)
Let’s face it, Auto White Balance (AWB) is tempting. Most cameras come with AWB setting: it’s convenient and often gets the job done under basic lighting conditions. Many newer DSLR cameras boast advanced AWB features that work quite well in a variety of situations.
However, it’s important to understand AWB’s limitations. While it may handle simple lighting scenarios well, it can struggle with mixed lighting or artificial light sources. These can lead to inconsistent color casts across your photos, making them look unprofessional or unappetizing.
- Functionality: Your camera analyzes the scene and selects an appropriate color temperature.
- Limitations: AWB might get confused by scenes lacking white, dominated by one color, or lit by various light sources.
Pro Tip
While AWB is a good starting point, always be ready to adjust, particularly in mixed lighting.
While convenient, sometimes Auto White Balance (AWB) can cause more problems than it solves. It tries to analyze your scene and automatically adjust color balance for each shot. Unfortunately, this can lead to inconsistent colors — your photos might look wildly different from image to image, even if the lighting remains the same.
AWB’s accuracy can also be hit or miss. If you’re just starting your photography journey, it’s a decent safety net. However, for truly consistent and professional-looking food photos, it’s best to explore other White Balance options.
2. White Balance Presets
Your camera has built-in Presets designed for different lighting situations. These Presets make it easier to get accurate, natural-looking colors quickly.
Start by choosing the Preset that matches your lighting (daylight, cloudy, etc.). This helps ensure that white objects appear truly white in your photo, giving you an excellent starting point for realistic colors.
- Toolbox: Presets cater to typical lighting conditions — daylight, cloudy, tungsten, etc.
- Selection: Match the preset with your lighting situation to enhance color accuracy.
- Impact: The right preset can significantly improve your food images, making them look more appealing.
Common Presets Include
- Daylight ☀️: Best for shooting in natural sunlight.
- Cloudy ☁️: Adds warmth to colors on overcast days.
- Shade 🏡: Corrects cool tones in shaded environments.
- Tungsten/Incandescent 💡: Balances the yellow tint of indoor lighting.
- Fluorescent 🌟: Neutralizes the greenish cast from fluorescent lights.
- Flash ⚡: Adjusts for the flash’s color temperature.
- Choose Color Temperature (K): Manually tweak the Kelvin value, ranging typically from 2,500 to 10,000.
One Light, No Problem. Multiple Lights, Uh-Oh!
White Balance Presets are your friend when the lighting is simple — like a room lit by a single type of bulb at night. Your camera can easily handle that.
But things get trickier when your scene has a mix of light sources — think warm indoor bulbs and daylight streaming through the window. Your camera’s Presets get confused trying to figure out what’s correct. That’s when you might need to ditch the Presets and take control for yourself.
3. Custom White Balance
Custom White Balance is a powerful feature available in many cameras, allowing for precise color control, especially in challenging lighting conditions. By setting a Custom White Balance, you inform the camera about the exact nature of true white under the prevailing lighting, enabling it to adjust all other colors accurately.
Say goodbye to color woes with Custom White Balance. It’s your secret weapon for those tough mixed lighting setups. Skip the presets and take direct control for the most accurate, vibrant colors in your photos.
Steps to Set a Custom White Balance
- Preparation: Obtain a neutral white or gray reference, like a white card or a plain piece of white paper.
- Positioning: Place the reference in the scene where your subject is, ensuring it’s illuminated in the same way as your subject.
- Camera Setting: Switch your camera to ‘Custom White Balance’ mode.
- Capturing the Reference: Photograph the White Balance card or paper, filling the frame, and ensure your light meter is at 0.
- Setting the Reference: Access your camera’s Menu, navigate to the White Balance settings, and select the image you just captured as the reference point.
- Finalization: With the reference set, your camera will adjust the White Balance based on this standard, applying a consistent and accurate color temperature across your scene.
This method is particularly effective in mixed lighting situations, where Presets might not provide the desired accuracy.
4. Adjust Kelvin Manually
The ‘Preset’ White Balance options are a good starting point, but sometimes they fall short, especially when you have multiple light sources in your shooting environment. This is where Kelvin White Balance comes in. It lets you manually enter a specific color temperature number, giving you ultimate control over the look and feel of your image. Think of it as fine-tuning the color temperature for a perfectly balanced photo.
- Control: Manually setting the Kelvin value allows precise adjustments — lower numbers for cooler tones, higher for warmer ones. Think of Kelvin White Balance like adjusting the thermostat for your photo’s color. Your image has a yellow or orange cast? Lower the Kelvin number (like turning down the heat) for a cooler result. Blueish tones got you down? Raise the Kelvin number (crank up the warmth) to balance things out.
- Versatility: This method provides the flexibility to fine-tune the color temperature to match your vision.
Remember
Lower Kelvin = Cooler colors
Higher Kelvin = Warmer colors, for a photo that looks just right.
5. Post-Production White Balance Correction


When you shoot in RAW, you unlock a powerful level of control over your images, particularly with White Balance adjustments. This format preserves all the data from your camera’s sensor, giving you the flexibility to make significant changes in post-production without losing image quality.
Key Tools in Editing Software
- Lightroom’s White Balance Tools:
- White Balance Presets: Quickly apply adjustments based on common lighting conditions.
- Eyedropper Tool: Allows you to select a reference point in the image that should be white or neutral, automatically adjusting the white balance.
- Temperature and Tint Sliders: Manually fine-tune the white balance by adjusting the color temperature and tint.
- Capture One’s White Balance Tools:
- White Balance Presets: Tailored adjustments for various lighting scenarios.
- Kelvin Slider (Temperature): Precisely control the color temperature with a slider, adjusting the image warmth or coolness.
- Tint Slider: Modify the green or magenta tint to perfect the color balance.
- Pick White Balance Cursor Tool: Select a point in the image to set the correct White Balance based on that reference.
In both Lightroom and Capture One, these tools serve as your starting point for White Balance correction. It’s essential to revisit your adjustments, ensuring the White Balance aligns with the desired look and feel of your image.
Think Beyond Global White Balance
While getting the overall White Balance right is important, don’t forget about targeted Local Adjustments. Color casts can happen within specific areas of your image, ruining the true look of your ingredients or background.
Local Adjustment Power: Fine-tune the White Balance of specific parts of your image — say, your main subject — without affecting the rest. This lets you keep the warmth in your food while ensuring a cool background remains true to its color. It’s the key to removing stubborn color casts, and achieving a polished final image.
Integrating these White balance techniques will improve your food photography, ensuring your subjects look as inviting and authentic as possible.
How to Creatively Use White Balance
While White Balance is typically adjusted to achieve accurate, natural-looking images, it also presents a canvas for creativity. Manipulating White balance allows photographers to infuse their images with mood, emotion, and narrative, transcending the bounds of mere color correction.
- Subjective Experience: Consider how different color temperatures affect the perception of an image. Reflect on the emotions and sensations evoked by various hues, and apply this insight to enhance the storytelling aspect of your food photography.
- Weather Representation: Use color temperature to symbolize climatic conditions. Warm tones can mimic the golden glow of summer, while cool tones can evoke the crispness of winter.


- Emotional Resonance: Food often triggers emotional responses. Amplify this by aligning the White Balance with the emotional undertone of the dish. For instance, a warm White Balance can make a bowl of soup appear more inviting, enhancing the sense of warmth and comfort it conveys.
- Ambiance Creation: The temperature of your White Balance can set the scene’s overall mood. Warm lighting can create an atmosphere of coziness and welcome, while cool lighting can introduce a sense of calmness or reflection, altering the viewer’s emotional response to the image.
By thoughtfully adjusting the White Balance, you can transform a straightforward food photograph into a more evocative and atmospheric composition. This creative control allows photographers to not only capture food, but also to tell a more compelling story through the interplay of color and emotion.
Wrapping It Up
As we’ve journeyed through the nuances of White Balance, I hope you’ve discovered its profound impact on food photography. It’s not just about correcting colors; it’s an artistic tool that lets you convey mood, evoke emotions, and tell a story through your images. If you’re fine-tuning to achieve life-like accuracy, or bending the rules for creative expression, White Balance is a powerful ally in your photography toolkit.
I encourage you to experiment with these techniques in your next shoot. Start by using Auto White Balance, then play with White Balance Presets, dive into Custom White Balance settings, play with Kelvin settings, and perhaps most importantly, let your creative instincts guide your use of White Balance. Remember, there are no strict rules in art, only guidelines and tools to help you bring your vision to life. But it’s important to learn the rules first to be able to break them later.
If you want practical tips after this guide, explore these white balance tips for food photography for more hands-on ways to improve your colors.
Now, I’d love to see how you apply these insights to your food photography. Share your White Balance challenges in the comments.
Now, I’d love to see how you apply these insights to your food photography. Share your White Balance challenges in the comments. Let’s inspire each other and push the boundaries of what we can achieve with our cameras and our creativity.