
Have you ever wondered how some food photographs look incredibly sharp and full of detail? I’ve been there. When I first stepped into the world of photography, achieving that perfect, tack-sharp focus in my food images felt like an elusive skill. Some shots looked like they belonged in a glossy magazine, while others… well, they didn’t quite make the cut. It took some trial and error, but along the way I discovered a few techniques that made a real difference.
Jump to:
In this article, we’ll go beyond the basics. I’ll share a few key techniques that can help improve the sharpness, and overall quality of your food photography. These are practical tips that made a real difference in my own work, and can help you refine your skills as well. Ready to get started? Let’s take a closer look at how to bring out the best in your food photographs.
What is a Sharp Photo?
Have you ever asked yourself, “What makes a photo look sharp?” It may sound like a simple question, but it’s an important concept in food photography. A sharp photo, in essence, is where the subject stands out in crystal-clear focus, boasting:
- Clean lines and defined edges
- Crisp details
- Zero unwanted blurriness
Imagine a pizza shot where every strand of melted cheese is visible, or a berry tart close-up where each sugar crystal seems to sparkle. That’s the sharpness we’re after.
In photography, we often talk about being ‘tack sharp’. This is not your everyday sharpness; it’s the gold standard. Tack sharp means the main subject is captured with such precision that the details feel almost tangible. It’s what transforms a good food image into an eye-catching masterpiece. It’s the difference between someone scrolling past your photo and someone who stops, stares, and wishes they could reach through the screen for a taste.
Reflecting on my early days, I’ll be honest — I struggled. Some photos nailed that magical sharpness, while others… simply didn’t. It was a mix of frustration and guesswork. But, as I delved deeper, I discovered that tack sharp photos aren’t about luck; they’re about skill, the right technique, knowledge, and a sprinkle of photography magic.
Why does sharpness matter in food photography? Because food is a feast of texture, color, and detail. We eat with our eyes first, and a sharp photo brings the food to life. It invites the viewer into the scene, making them feel like they could actually touch, smell, and taste the food. That’s the true power of a sharp photo.
The 21 Secrets to Tack Sharp Food Photography

Diving into the world of food photography, you quickly learn that capturing those drool-worthy, tack sharp images is an art form in itself. It’s not just about having a good eye; it’s about mastering a set of techniques that elevate your photos from good to unforgettable. Let’s peel back the curtain on the first secret that will change the way you approach food photography.
1. Use a Tripod

Using a tripod is one of the best decisions you can make for your food photography. Also, it’s the best practice if you aim to be a professional. Here’s why:
- Stability: The most obvious benefit. A tripod keeps your camera dead-still, eliminating any risk of blur from shaky hands.
- Consistency: With a tripod, you can maintain the same angle and composition across multiple shots.
- Precision: When your camera is securely mounted, you can fine-tune your composition, focus, and settings without worrying about losing your framing.
- Long Exposures: Want to capture that perfect pour shot or play with lighting in a dark setting? A tripod makes it possible to use longer shutter speeds without the blur.
- Freedom: This might sound counterintuitive, but a tripod actually frees you up. You can step back, evaluate your scene, tweak your styling, and make sure everything is just right without losing your shot.
Choosing the Right Tripod
Not all tripods are designed the same. Your choice should depend on your camera’s weight and your shooting style. Here are a few tips:
- Weight Capacity: Make sure the tripod can handle your camera and your heaviest lens with ease.
- Height and Flexibility: Look for a tripod that extends to your desired height and has flexible legs to shoot at different angles.
- Portability: If you’re shooting on location, consider a tripod that’s lightweight and compact for easy travel.
Remember
Investing in a good tripod can greatly improve your food photography. It keeps your camera stable, helping you capture sharper images and giving you more control over your setup.
2. Master Handheld Photography, when not using a Tripod
Sometimes, a tripod just is not an option. Maybe you’re in a tight space, or on the move. That’s where mastering handheld photography becomes important..
Follow the Handheld Photography Rule: When shooting handheld, try to keep your shutter speed at least as fast as the inverse of your focal length. For example, if you’re using a 50mm lens, aim for a shutter speed of 1/50 second or faster. This guideline helps reduce camera shake, and keep your images sharp when you’re not using a tripod.
Why This Works: It’s all about minimizing blur. The faster your shutter speed, the less time there is for any hand movement to impact your photo’s sharpness.
Handheld photography offers freedom and spontaneity, but it also demands precision. By following these tips, you’ll nail those sharp, dynamic shots, tripod or not.
3. Enable Live View for Precision Focus
In the quest for tack sharp food photography, your camera’s Live View Mode is an unsung hero. It’s like having a magnifying glass for your scene, ensuring every detail is in perfect focus.
How Live View Changes the Game:
- Real-Time Feedback: What you see is what you get. Adjust your focus in real-time, and preview the exact shot you’re about to take. If you want even larger and more precise view while shooting, tethering in food photography can make focus and composition much easier.
- Zoom for Detail: Most cameras allow you to zoom in on your subject in Live View Mode. Use this to check and adjust focus down to the finest detail.
- Composition Perfection: Live View gives you a full-screen view of your composition, making it easier to arrange elements for that perfect shot.
Making the Most of Live View
- Start with a Tripod: For the ultimate precision, pair Live View with a tripod. This combo lets you fine-tune your focus without losing your composition.
- Battery Power: Live View can be a drain on your battery. Keep a spare handy, so you don’t run out of juice at the crucial moment.
- Use Manual Focus: With the magnification Live View offers, Manual Focus becomes a powerful tool for achieving pinpoint sharpness.
4. Focus on the Hero
Always ensure your camera is focusing on the subject you want to be in focus. In food photography, we want the viewer to see our hero, the main subject.
Why Hero Focus Matters
- Draws the Viewer In: Focusing on the hero creates a focal point that draws the viewer’s eye.
- Emphasizes Quality: Sharp focus on the hero showcases the quality and freshness of the ingredients.
- Tells a Story: Your focus point tells the story of the subject. Make it count.
Tips for Hero Focus
- Choose Your Angle Wisely: Depending on the subject, the best angle to highlight the hero can vary. Experiment to find the most flattering perspective.
- Aperture Awareness: Use a wider Aperture (lower f-number) to isolate your hero with a Shallow Depth of Field, making it stand out sharply against a blurred background.
- Check and Double-Check: After focusing, take a moment to review your shot. Ensure your hero is as sharp as it deserves to be.
5. Keep Your ISO Low
High ISO can be a quick fix for low light, but it comes with a cost: noise. And noise is the enemy of sharpness in food photography.
Why Low ISO is Key
- Cleaner Images: Lower ISO values result in cleaner, sharper images with less grain or noise.
- Better Detail: Low ISO preserves the fine details of your food, from the texture of bread crust to the sheen on a chocolate glaze.
- More Post-Processing Flexibility: Cleaner images give you more leeway in post-production without exacerbating noise.
Balancing ISO and Exposure
The ideal ISO depends on your camera, as different sensors handle noise differently. Modern cameras have improved significantly, and many can produce clean images at ISO 800 or even 1600, especially full-frame models. Still, using the lowest ISO possible usually helps maintain the best image quality.
In scenarios demanding a quick shutter speed (like capturing motion), it’s wiser to slightly increase the ISO rather than risk underexposing your photos. However, aim to keep your ISO at its lowest base value, whenever feasible. This practice ensures the sharpest photo quality.
6. Don’t Shoot in Auto Mode — Embrace Manual Mode

Relying on your camera’s Auto Mode is like letting someone else season your food. It might turn out okay, but it won’t be tailored to your taste. The same goes for photography. Manual Mode puts you in control, allowing you to make decisions that lead to sharper, more dynamic images.
Why Manual Mode Matters
- Creative Control: Adjust Aperture, Shutter Speed, and ISO to yourexact needs, highlighting the textures and details of your subject.
- Consistent Results: Once you find the perfect settings for your environment, you can maintain consistency across your shots.
- Better Low Light Performance: Manual Mode allows you to balance ISO, Aperture, and Shutter Speed for the best possible performance in any lighting condition.
Getting Comfortable with Manual Mode
- Start Simple: Begin with one variable at a time. Adjust your Aperture, see the effects, then experiment with Shutter Speed and ISO.
- Practice Makes Perfect: The more you shoot in Manual, the more intuitive it will become.
7. Ditch Auto Focus for Manual
Auto-Focus is a fantastic tool, but it’s not infallible, especially in the nuanced world of food photography where the slightest shift can change your focal point. Manual Focus puts you in charge, ensuring your hero food is always perfectly sharp.
Benefits of Manual Focus
- Pinpoint Accuracy: Adjust the focus to the exact point you want, without relying on your camera’s guesswork.
- Better in Low Light: Cameras can struggle to Auto-Focus in dim conditions. Manual Focus gives you control regardless of the lighting.
- Creative Control: Decide exactly what part of your image will be sharp and what will be blurred, directing your viewer’s attention precisely where you want it.
Mastering Manual Focus
- Use Live View: Zoom in on your subject in Live View Mode to adjust your focus with high precision.
- Take Your Time: Manual focusing requires patience. Take the time to ensure your focus is perfect before taking the shot.
8. Turn On Image Stabilization (When Needed)
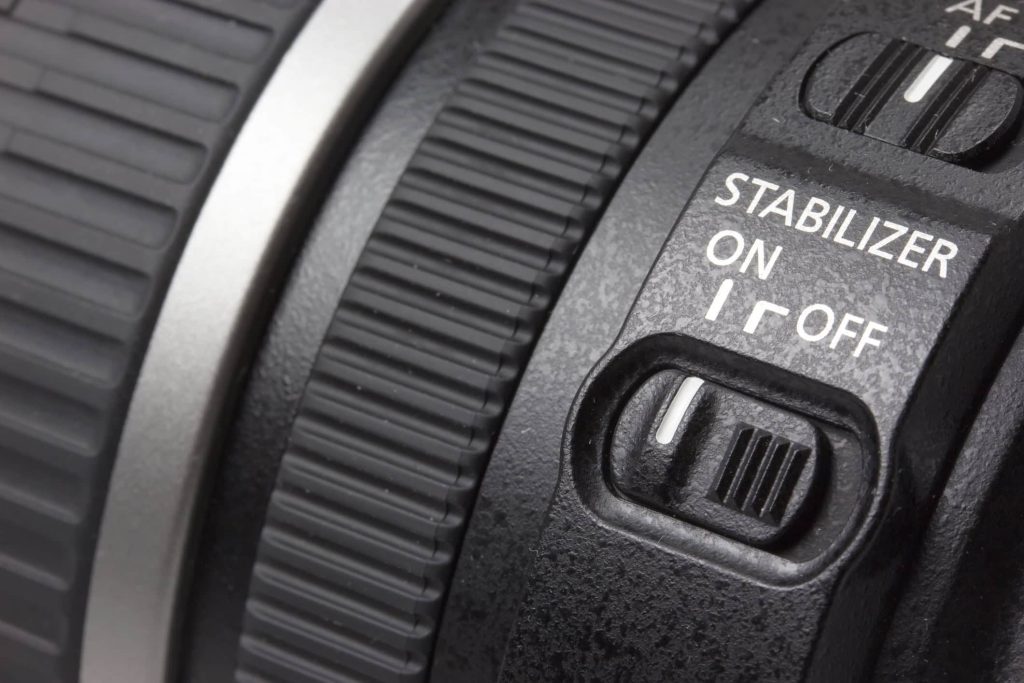
Many cameras and lenses come equipped with Image Stabilization (IS), a feature designed to reduce blur caused by minor hand movements. It’s particularly useful in handheld shooting or in low-light conditions where you need to use a slower shutter speed.
To activate Image Stabilization, search for an On/Off switch located on the lens barrel. If not found there, the option should be available within the camera’s menu settings.
When to Use Image Stabilization
- Handheld Shooting: If you’re shooting without a tripod, IS can be a lifesaver, compensating for small movements to keep your shots sharp.
- Low Light Conditions: In situations where you need to lower your shutter speed to let in more light, IS helps maintain sharpness.
Pro Tip
Turn IS Off on a Tripod: When your camera is on a tripod and there’s no risk of hand movement, turn off IS. It can actually introduce blur if it tries to compensate for non-existent movement.
9. Keep Your Equipment Clean
It might seem basic, but keeping your camera and lenses clean is crucial for tack sharp photography. Dust, fingerprints, or smudges can soften your images and reduce contrast, making your photos look less sharp than they actually are.
Tips for Keeping Your Gear Clean
- Regular Lens Cleaning: Use a soft, lint-free cloth and lens cleaning solution to gently clean the front and rear elements of your lenses.
- Sensor Cleaning: Dust on your sensor can appear as spots in your images. Use a sensor cleaning kit or take your camera to a professional for regular cleaning.
- Protect Your Gear: Always use lens caps and camera bags to protect your equipment from dust and scratches.
10. Get Your Eyes Checked
Believe it or not, your vision plays a significant role in the sharpness of your photos. If you’re straining to see through the viewfinder or squinting at your LCD screen, it’s time for an eye check-up. Sharp photography starts with sharp vision.
Vision’s Impact on Photography
- Accurate Focus: Clear vision ensures you’re focusing precisely where you intend.
- Detail Recognition: Spotting fine details in your composition requires good eyesight.
- Post-Processing Precision: Post-processing images with less-than-perfect vision can lead to missed imperfections.
Good Vision Habits
- Regular Eye Exams: Keep your prescriptions up to date to ensure you’re seeing your subjects clearly.
- Take Breaks: Long shooting sessions can strain your eyes. Take regular breaks to keep your vision sharp.
11. Lenses Matter: Choose Wisely
The lens you choose can make or break your food photography. High-quality lenses are capable of capturing the minute details and textures that bring a subject to life.
Prime vs. Zoom Lenses
- Prime Lenses: Known for their sharpness, Prime Lenses have a fixed focal length, offering unparalleled clarity.
- Zoom Lenses: Offer flexibility but can sometimes compromise on sharpness compared to Prime Lenses.
Lens Selection Tips
- Invest in Quality: High-quality lenses are an investment in your photography’s future sharpness.
- Rent Before You Buy: Rent your lenses before you finally buy them. This way, you have time to test them, and make your decisions wisely.
12. The Aperture Sweet Spot
Every lens has an aperture sweet spot, typically about 2–3 stops down from its widest aperture, which often places it around f/8 on many lenses. At this aperture, lenses usually produce their sharpest results.
Why the Sweet Spot Matters
- Edge-to-Edge Sharpness: Shooting at the sweet spot minimizes softness at the edges of your photo.
- Depth of Field: It provides a balanced depth of field, keeping your subject sharp, while softly blurring the background.
How to Find Your Lens’ Sweet Spot
- Experiment: Take a series of photos at different Apertures and compare the results.
- Research: Look up reviews and tests of your lens to see if there’s a consensus on its sweet spot.
13. Maintain Camera-to-Subject Distance
Once you’ve focused on your subject, maintaining the same distance between your camera and the subject is crucial. Any movement can throw off your focus, especially when shooting with a Shallow Depth of Field.
Maintaining Distance
- Use a Tripod: This keeps your camera stationary, helping maintain a consistent focus.
- Mark Your Spot: If you’re shooting handheld, mark your standing position to ensure you return to the same spot after moving around.
14. Use a Remote Shutter or Timer
Pressing the shutter button can introduce vibration, potentially blurring your image. Using a remote shutter release or your camera’s timer function can eliminate this risk.
Remote Shutter Release
- Cable Release: A physical connection to your camera, offering immediate response.
- Wireless Remote: Offers the flexibility to shoot from a distance, perfect for minimizing disturbance to your setup.
Using Your Camera’s Timer
- Built-In Timer: Most cameras have a built-in timer. A 2-second delay is usually enough to let any vibration dissipate before the photo is taken.
15. Adjust Your Diopter for a Clear View

Ever noticed that tiny dial next to your camera’s viewfinder? That’s the diopter, and it’s crucial for sharp photography. Adjusting the diopter ensures the viewfinder’s focus matches your eyesight, making it easier to judge sharpness accurately.
Quick Diopter Adjustment
- Look through the viewfinder at a blank, well-lit surface.
- Adjust the diopter until the focus points in the viewfinder look sharp to your eye.
This simple step can significantly impact your ability to capture tack-sharp images.
16. Embrace Mirror Lock-Up for DSLR Users
DSLR cameras have a mirror that flips up when you take a photo, which can sometimes introduce small vibrations and cause slight blur. Using the Mirror Lock-Up feature lifts the mirror before the exposure, helping reduce vibration and improve image sharpness.
How to Use Mirror Lock-Up
- Enable Mirror Lock-Up in your camera settings.
- Press the shutter button once to lock the mirror up, then again to take the photo.
This technique is especially useful for long exposures or when absolute sharpness is critical.
17. Back Button Focusing: A Game Changer
Back-button focusing allows you to control focus using a separate button on the back of the camera instead of the shutter button. This gives you more control and helps ensure your subject stays sharp.
Why Back Button Focusing Rocks
- Maintain Focus: Once you’ve focused on your subject, you can recompose and shoot without losing focus.
- Speed and Efficiency: It’s faster to shoot and refocus, especially in dynamic environments.
Experiment with back button focusing to see how it can improve your workflow and image sharpness.
18. Harness the Power of Capture One’s Focus Mask
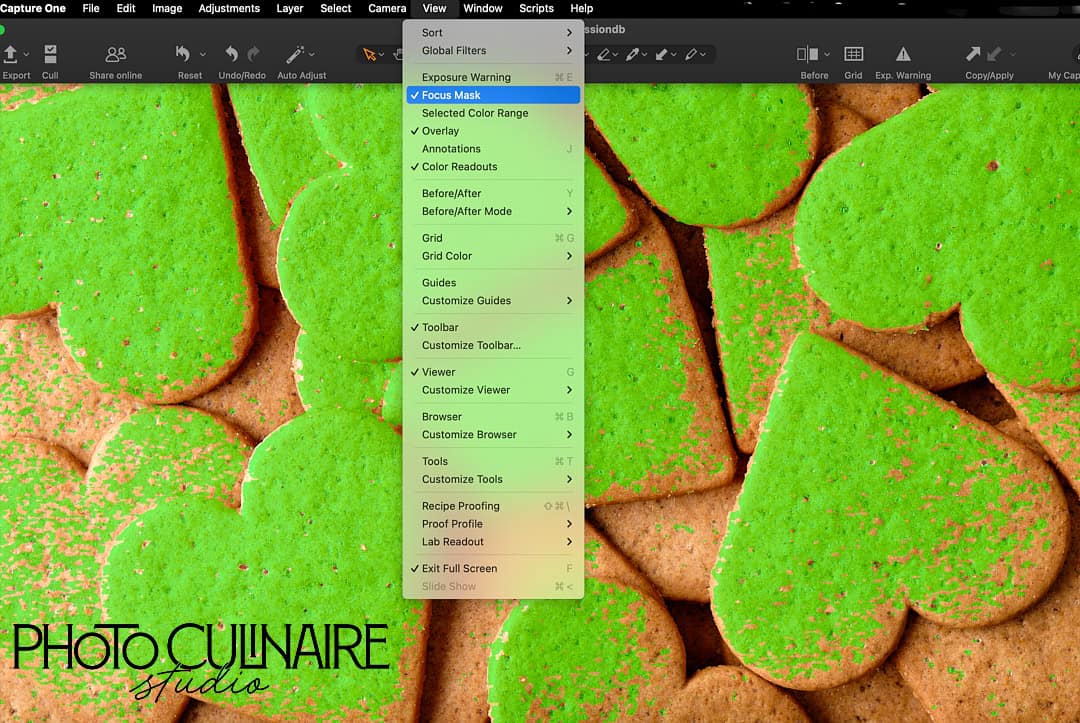
Capture One‘s Focus Mask feature (my absolute favorite) is a game-changer for ensuring your photos are sharp where it matters. It highlights in-focus areas, taking the guesswork out of the picture when deciding your final images.
Using Focus Mask
- The Focus Mask can be activated by choosing either View>Show Focus Mask, or clicking on the Focus Mask icon in the toolbar.
- The areas that are sharply focused will be displayed by the mask.
Note
The Focus Mask is only compatible with RAW files.
19. Understand Your Minimum Focusing Distance
Every lens has a minimum focusing distance, and knowing yours can prevent frustratingly blurry shots when you’re trying to get close to your subject.
Tips for Close-Up Shots
- Check Your Lens Specs: Know the minimum focusing distance of your lens and keep it in mind during close-up work.
20. Sharpen in Post-Processing: The Final Touch
In most cases, it helps to add some sharpening in your favorite post-processing software. Even with all the right techniques in the field, sometimes your images might need a little extra sharpness. That’s where post-processing comes in. A touch of sharpening in your editing software can make your food photos pop.


Post-Processing Sharpening Tips
- Use Sparingly: Over-sharpening can introduce noise. Less is often more.
- Sharpen for Output: The amount of sharpening can depend on whether your image is for web or print.
A carefully sharpened image can truly stand out, making your food photography more appealing and professional.
21. Artificial Light: Your Ally for Sharp Photos
Natural light is beautiful, but it isn’t always predictable or available. Artificial lighting — such as strobes, flashes, LEDs, or continuous lights — offers greater consistency and control, which can help you achieve sharper food photographs.
Why Go Artificial
- Consistent Light: No more racing against the changing light of day. Artificial light gives you the same quality of light, for as long as you need.
- Control: Adjust the intensity, direction, and quality of light to highlight the textures and details of your food.
- Freeze Motion: High-speed flashes can freeze motion, capturing sharp images of dynamic scenes, like pouring sauce or a splash of wine.
With artificial light sources, you break free of several exposure limitations that hold you back when you’re taking pictures in natural light.
Wrapping It Up: The Secret Sauce to Sharp Shots
And there you have it — a collection of techniques to help improve the sharpness and overall quality of your food photography. Achieving crisp, well-focused images isn’t about having the most expensive gear or complex editing tools. It’s about understanding your camera, using the right techniques, and practicing with patience.
Your Next Steps. . .
You’re now armed with the knowledge to transform your food photography. But like any great recipe, the secret ingredient is always practice. Experiment with these tips, mix and match techniques, and don’t be afraid to sprinkle in a little of your own creativity.
Let’s Keep the Conversation Cooking:
I’m all ears (and eyes)! I’d love to hear which of these tips you’re most excited to try out. Share your thoughts, questions, or favorite techniques for capturing sharp images in the comments below.
. . . . .